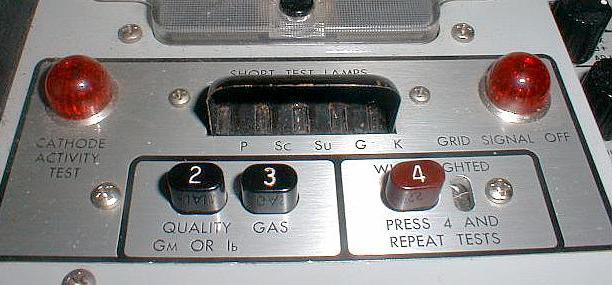
(Click to see photo of short lamps and test buttons)
Step 1: Shorts and Leakage
Just below the meter there is a metal hood which shades 5 neon
lamps. These are the shorts indicators, and are the first thing
you should check. They become active as soon as the test is
started at the computer, you don't
have to press any buttons on the tester. If any of these lamps
are
flickering or glowing, then an inter-element short in the tube is
indicated and the tube should be considered bad. Do not press any
buttons and do not continue testing if any of the shorts indicators are
glowing.
(Click
to see photo of short lamps and test buttons)
If you want to perform a more sensitive grid shorts test, open the hinged door on the right side of the tester and press the "Sensitive Grid Shorts" button. It is a good idea to just get in the habit of performing this test, especially on audio tubes. It will cause the grid shorts lamp to glow if the tube has even an extremely small leakage path to the control grid.
Now observe the meter. With no buttons depressed, the meter is
indicating
the heater to cathode leakage. We are on step one, so we read the
top
meter scale, appropriately labeled with a "1". If the reading is
not
within the green area on the top meter scale, then the heater to
cathode
leakage current is excessive. This completes the shorts and
leakage
tests.
(Click to
see photo of meter)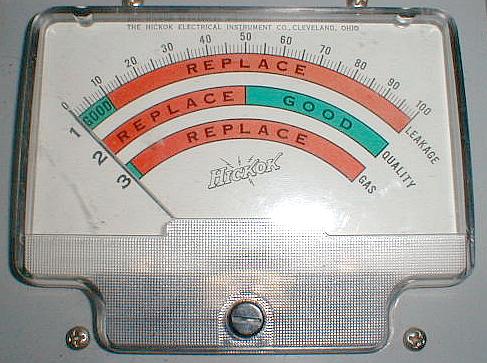
Step 2: Quality Test
The quality test is performed simply by pressing button "2" and reading meter scale "2". The meter indicates the tube's "quality". Anything above half scale is passing, anything below that is failing. You can consult the computer screen to convert this reading directly to uMhos or mA. If the test is a transconductance (uMho) test, you can make sure you are getting a very accurate reading by pressing the "Grid Sig. Off" button. Again this button is under the hinged cover on the right side of the tester. This should make the meter drop to zero, indicating a perfectly balanced Gm bridge measuring circuit. If the reading is something other than zero, you can use the Gm Balance controls to null the meter to zero.
As a part of the quality test, you may wish to perform the cathode activity test. Press the "Cath. Act." button. This reduces the heater voltage by 10%. If after 1-1/2 minutes the reading has dropped by more than 10% of the tube's normal reading, then the tube should be rejected.
Sometimes the shorts lamps may flicker or glow during the quality test. This is normal. The only time you should pay attention to the shorts indicators is when button "2" is not pressed.
Step 3: Gas Test
The last step is the gas test. Press button "3" to perform this test, and read meter scale "3". If the tube is excessively gassy, the meter will deflect above the green area.
The tests are complete unless the lamp next to button "4" is lit. This indicates a dual section in the tube that can be tested with a single test. Simply perform all the tests twice, once with button "4" held down, once without.
If there are no other tests programmed for this tube, you are done. The computer screen will indicate how many tests are involved for this tube (could be anywhere from 1 to 6 tests) and which test you are currently on. To end this test and/or go to the next test, release all buttons and press the space bar. Please do not press the space bar (or ESC) before releasing buttons "2" or "3".
Do not perform the Filament Standard Adjust test. Normally, you would need to perform this adjustment for each different tube type to achieve accurate results. The computer now does this for you. All you need to do is a one time check when you first hook your tester up. First, type in "TEST12" for the tube number. This will bring up the Filament Standard Adjust test. Type "T" to start the test, then press the "Filament Std. Adj." button. Use the "Filament Std. Adj." control to adjust the meter reading to half scale. This sets the tester to your line voltage, and probably won't need any further adjustments unless your line voltage varies a lot.